Tuesday, March 27, 2012

Helmet Hair

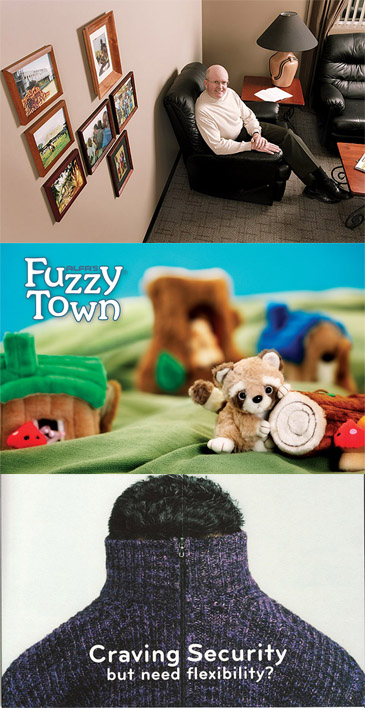
Just out... after a year. Check out the story at Nu-Mode Magazine.

So, here are the pages, followed by some concept images and bts of making the hairstyles.


The original concepts for the hairstyles from my sketchbook.

This mask used hair extensions wrapped and pinned around a
cut-out in the shape I wanted, then the model's hair was wrapped
around that to integrate the real hair seamlessly with the mask

This hairstyle I practiced with a wig, but at the shoot
it was created with only the models' real hair.

This piece was created with millions of tiny braids,
formed and stiffened into a lacy mask, then pinned to the model's hair.

This look started with a wig that I shaped and hardened
into a helmet. I didn't use the long under-wig at the shoot,
preferring to use the model's own hair, smoothed and
straightened to shiny helmet-ness.

Again, I practiced on a wig, but the final hairstyle
was created using the model's own long hair.
So there, now you know all my secrets! A lot of pre-planning, a lot of practice, and a lot of work on the day to create 6 completely different hairstyles. And make-up, although that wasn't the focus on this one. :)

Art direction, hairstyling and make-up by me
photography by Robert Kenney
styling by Joanna Kulpa
modelling by Lucy @ LizBell Agency

Monday, March 5, 2012

I'm Fame'd-ous!


Yes, that's right, I am the featured "industry professional" in the March issue of Fame'd, an online magazine dedicated to the Vancouver fashion community.

I was interviewed by the charming Ashley Perfonic and had the opportunity to chat about my passion for art direction and photoshoots and the joy of collaborative creative projects.

Thanks, Fame'd, for the feature!

You can check it out the full article here.

Wednesday, February 8, 2012

Commercial "prop"erty

Part 2 - here are some samples of props created specifically for commercial applications. I actually love small props, every one is different, they are incredibly intriguing and rewarding to make!

The following props are made to be shot "in camera", so (aside from text on the plane) they are not digital composites, which actually makes them a lot more fun to shoot as well. :)

Yes, I physically (and with some effort) moved that 4" thick marine rope
into the logo shape on a dock we had custom-painted in the Port red,
covering an area of about 100 square feet. And that man is actually sitting
inside a mock-up kit plane I constructed out from massive sheets of
cardboard, in addition to styling him in authentic period flying gear.
I also designed, sketched and did the intricate cut-outs on the paper sculptures.

Tuesday, February 7, 2012

Creating the right setting

Today I got to thinking about all the sets I've done and decided to gather up some samples from the last few years. These sets are all studio sets that I designed, painted, filled with props, furniture, flooring, etc.

Lucky for me, Fred is pretty handy with the big tools, so big kudos to him for creating the walls, wooden flooring, and other structures that were the base for so many different looks.

These sets were mainly fashion-oriented, or for creative works. It's getting late, so I think I'll do a follow-up post in a bit to show set dec and props for commercial shoots.

This series is from our current studio (see the first image), and certainly many more to come in future!


This next series was created in our previous studio location:


Monday, January 30, 2012

Here's what happened...

Last Sunday I didn't want to just sit around doing nothing while my "go to" photographer collaborator had soccer commitments. I wanted to do some fun make-up, and I decided I would just see if someone would be willing to show up and we could "play".  And I would take some snaps of the make-up, available light kind of thing.

So I asked Renata, who is a gorgeous model (inside and out) I've worked with before if she wanted to play, and she said she was in.

Then I decided I wanted to explore a theme for the make-up, sleeping, and her eyes would be closed "dreaming" for all the shots. Then I thought... hm... wardrobe... and I called another friend, Natalie to see if she was in for a play day. And, happily, she was! So, we were all set to play on Sunday and then I realized I needed some help if I was going to take the kind of shots I wanted.

I knew the compositions and poses I was after, and the make-up, but the photography... I needed a turbo course in camera settings! Fred to the rescue. He gave me a basic course on the settings and how to manipulate them on his camera to be able to work in the lower light conditions (dark rainy day). He's a supportive guy, I have to say.

So, Natalie and Renata were a dream to create with, the images are sweet and dreamy, I had a lot of fun, and I know that I will always prefer to work with great photographers I get to collaborate with (especially with anything trickier than available light)... I just had to get some of that posing out of my system!

Anyway, that's how it happened, and no, I'm not planning on being a photographer now. I much prefer to be an art director!


styling - Natalie Tusznio
hair/make-up, photography - me
model - Renata @ Liz Bell

Tuesday, January 24, 2012

Antler Angel

As promised... the final shots. You can also go to Fred's blog for the photographer's take on this project. While you're there, take a few minutes to peruse all the other beautiful images he has posted. :)


Muse - Kristy J

Monday, January 23, 2012

"prop"er shoot

I LOVE MAKING PROPS!

Sometimes you just need to emphasize the obvious. Sometimes I think I'd be happiest making props all day long if I could make a living at it. Then again, I also love art directing... and make-up... and design... sigh. Does a person ever really know what they will be when they grow up?

Back to props. I recently decided that I needed to make antler angel wings, kind of an Artemis hunter-goddess thing, I guess.

I found some antlers on my favourite prop source of all time, Craigslist, and Fred and I made the journey to Langley to get them. As it turns out there were several sets, so I picked through the choices, weighed and squinted, until I was satisfied I had selected the "ultimate" rack. Larry, the antler source, told us they're whitetail (lighter colour, denser/heavier material) and that he'd acquired them from an estate sale of some old fellow who had them in a shed. So, they're vintage, which is even better! :)

Value Village was the first stop to find a matching pair of
genuine leather belts to construct the harness.
An internet search recommended Barge contact cement for leather to
leather, so a second trip to the stores for that, plus some leather laces.
Every good project involves chocolate and cappuccinos.


I glued the cut pieces of leather together and Fred helped me
clamp them to set overnight for maximum hold.
After scraping the dried icky bits and cleaning, then oiling the
antlers, I took a rasp file to them to flatten the back and remove
any sharp parts that might be felt through the leather.
The glued harness as it appeared once I removed the clamps...
sadly the glue was still gooey, so I needed to rivet the straps.
Fortunately, Fred had the tools handy for me to drill holes and
rivet the harness. I also drilled holes for strapping on the antlers.
Here is the riveted harness with antlers strapped on.
And the final antler wing harness after I painted on some
"antiquing" white paint to blend better with the antler colour.
Fitting the harness to Kristy before doing the hair and make-up.
And that's as far as I can take you tonight. Tomorrow (hopefully) I'll blog the final images from the shoot. Fred shot this session as collodian wet plate ambrotypes, and the plates are still curing before they are hard enough to scan, so I'll have to be patient and wait to share them.